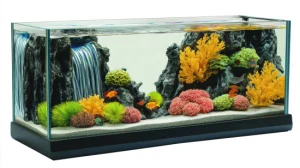
Top Fin® Half Moon Aquarium – 3.5 Gallon
- Single LED light
- Hood with convenient feeding door
$39.99
Setting Up My First Nano Tank with the Top Fin 3.5 Gallon
I’ve always loved aquariums and kept thinking it would be so cool to have one of my own. But the idea of maintaining a huge tank seemed daunting as a beginner. So when I discovered nano tanks, I knew that would be the perfect way to start!
After doing some research, I decided to go with the Top Fin 3.5 Gallon tank kit. The size felt manageable for my first tank. And Top Fin had great reviews as an affordable beginner brand.
Once I had it home, I was eager to set up my very first tank! Here’s a run down of that process in case it’s helpful for other nano tank newbies.
Step 1: Wash the Tank Parts
The first thing I did was give the tank and accessories a good wash with water only – no soap! This removed any residual oils or debris from manufacturing and shipping.
I used a soft sponge and rinsed each item under warm tap water. For the tank I made sure to hit all sides. I gave extra attention to small crevices and tubes that could trap gunk.
Step 2: Add the Substrate
After drying everything thoroughly, I added the substrate that came with the kit. Top Fin provides natural colored gravel.
I put down about an inch layer across the whole bottom. Smoothing it out evenly not only looks better but helps avoid debris getting trapped.
Step 3: Install Filter and Heater
Next up was the hang-on-back style filter that’s included. This was super easy to install. I just had to hook it onto the back rim of the tank.
The filter came with a 50 watt preset heater already built in. This saves space and makes maintaining an ideal tropical temperature effortless.
I plugged in both the filter and LED light to test them out before going further. Everything worked great right out of the box!
Step 4: Fill the Tank Slowly
Here’s an important tip: fill the tank slowly to avoid clouding. I used a plastic cup and gently added water while aiming at the tank walls. This prevents disturbing the substrate.
I filled it about halfway and let the filter run for a bit. Checking for any leaks or issues. Since it looked good, I finished filling it to about an inch from the top.
Step 5: Treat and Heat the Water
Once filled, I used a liquid water conditioner to remove chlorine and heavy metals. This makes tap water safe for fish.
Then I let the tank run for about an hour to heat up. The preset heater got it to the ideal 78°F temperature quickly. And I was ready to start cycling!
What’s Included in the Top Fin 3.5 Gallon Starter Kit
One of the things that appealed to me about this nano tank kit was that it provided everything I needed to get started right away. Here’s an overview of what comes in the box:
- 3.5 gallon glass tank – Sleek, clear design with plastic trim. Dimensions of the tank are roughly 16 x 8 x 9 inches.
- LED hood light – Hinged lighting with white, blue, and red LEDs. Gives shimmer effect and helps plant growth.
- Filter – Hang-on-back power filter designed for 3-10 gallon tanks. Flow rate of 45 GPH. Includes preset 50W heater.
- Natural gravel substrate – About 3 lbs of smooth, natural looking gravel in tan color.
- Sample water conditioner – A 1oz bottle of BettaSafe to dechlorinate and make tap water safe.
- Bio foam insert – Extra filter media insert for beneficial bacteria growth.
It really provides everything needed to get the tank set up and cycling right away. The only extra supplies I picked up were a thermometer and fish net.
Determining Stocking for a 3.5 Gallon Nano Tank
One of the first things I needed to figure out was how many fish I could keep in this 3.5 gallon tank. I wanted a variety but didn’t want to overload the small space.
The general rule of thumb is 1 inch of fully grown fish per gallon of water. But that doesn’t work perfectly for tiny nano tanks.
After more research, I decided to stick with just one betta as the focal point fish. Their long flowing fins and lively behavior are perfect for a planted nano tank.
To complement the betta, I added 3 small tetras and 2 snails. This made for a nicely stocked tank without being overcrowded.
I also learned that tank shape plays a role. With its wide footprint, the Top Fin 3.5 provides more horizontal swimming space. This allows for a few more fish than tall, narrow nano tanks.
No matter what though, successfully stocking a nano tank requires choosing suitable fish. Small, peaceful species that don’t need schools or lots of room are best.
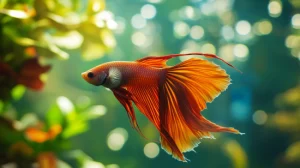
Keeping a Beautiful Betta in the 3.5 Gallon Tank
Of course, the star of my new tank setup was the gorgeous crowntail betta I picked out. His bright colors and flowing fins really pop against the green plants!
I specifically chose the Top Fin 3.5 gallon because it makes an ideal betta tank. At 3.5 gallons, it holds enough water to dilate their labyrinth organ while still being small enough to explore their territory.
And the included heater and filter creates the warm, gentle water flow bettas need to thrive. The lighting even simulates their natural habitat beneath tropical waters.
To give my betta plenty of territory to claim, I added some silk plants, driftwood, and a leaf hammock near the surface. This community style setup keeps him engaged and active.
Seeing his personality shine in this tank has been amazing! I’m so glad I went with the Top Fin 3.5 gallon kit to start out. It created the perfect home for a healthy, active betta.
Hang-on-Back Filter for Easy Maintenance
One of the things I appreciate most about the Top Fin 3.5 setup is the hang-on-back filter design. As a beginner, an easy to use filter was essential.
This style filter has completely simplified maintenance. I just have to open the lid and slide the cartridge out when needed for swapping or rinsing.
The filter came with two cartridges – a foam pad for mechanical filtration and a filter floss cartridge with activated carbon.
It also has space to add extra filter media like the biomax bio balls included in the kit. This helps beneficial bacteria colonies thrive.
The adjustable flow rate and extendable intake tube are also nice features. I can direct the water flow and customize it for my tank.
Overall, this hang-on-back filter has been perfect for my needs. With simpler access and maintenance, it takes one more task off my hands as an aquarium novice!
Maintaining Water Quality in a Small Tank
While nano tanks are beginner friendly in many ways, one challenge is keeping water quality stable. With less water volume, even small issues can quickly change parameters.
Luckily, the Top Fin 3.5 setup provides the key elements for maintaining quality:
- Filtration – The hang-on-back filter processes waste efficiently in a small footprint.
- Routine water changes – I change out 25% of the water weekly to replenish minerals and reduce nitrates.
- Live plants – Several easy stem plants uptake excess nutrients and release oxygen.
- Cleaning – Every couple weeks I wipe down the glass and vacuum debris from the substrate.
- Testing – Using a liquid test kit 1-2 times a month lets me catch any changes in ammonia, nitrites, or pH right away.
With diligent tank maintenance and monitoring, I’ve been able to maintain very stable water parameters. The small size of this 3.5 gallon tank makes that achievable even for beginners.
Lighting Options for a Planted Nano Tank
Having live plants was a must for me, so good lighting was essential. The sleek hinged LED light that comes with the Top Fin kit has worked out great.
It has an on/off switch with two brightness settings. The white LEDs provide brightness for visibility while the blue LEDs support photosynthesis.
I keep it on the lower brightness, for about 8 hours a day. This provides ample light for the plants without promoting algae growth.
The light attaches securely to the tank with adjustable legs. This allows placing it at the optimum height to illuminate the whole tank.
For more advanced setups, many hobbyists choose to upgrade with stronger planted tank lights. But for my purposes as a beginner, I found the stock light perfect for the plants I’m keeping.
Choosing Low-Tech Plants for My 3.5 Gallon Tank
Live plants bring so much life and color to a tank. I knew I wanted the ease of low maintenance varieties for my first planted tank.
These are the low-tech plants I chose which are all thriving in my Top Fin 3.5 gallon setup:
- Java Fern – Hardy, broad-leafed plants that are nearly impossible to kill and grow in low light. They’re attached to driftwood rather than planted in the substrate.
- Anubias – Similar to Java Fern, these plants grow on wood or rock. Their broad emerald leaves contrast nicely with driftwood. Slow growing but stays compact.
- Cryptocorynes – Bushy crypt plants grow along the back wall of my tank. They have interesting reddish-green leaves and grow moderately fast. Don’t require high light.
- Amazon Sword – Adds height and dimension in the middle ground. Not as hardy as crypts or anubias but still relatively easy and undemanding.
Focusing on these beginner friendly varieties has allowed me to enjoy the beauty of live plants with very minimal maintenance. Their low light requirements also prevent any major algae issues.
Managing Water Temperature in a Nano Tank
Maintaining a stable, tropical temperature was a top priority for me with this nano tank. Drastic temperature fluctuations can shock fish and negatively impact health.
Thankfully the included 50 watt preset heater makes this incredibly easy in the Top Fin kit. The heater is integrated into the filter where it efficiently warms the filtered water.
The preset temperature keeps the tank consistently at 78°F – perfect for bettas and most community fish. I don’t have to manually adjust anything or monitor closely with a thermometer.
The heater is sized appropriately for nano tanks between 3-10 gallons. In testing, it had no problem maintaining 78° all day and night in my tank.
Having this preset heater included right in the filter has been awesome. It takes the hassle and guesswork out of heating a small tank for beginners like myself.
I never have to worry about temperature – it runs precisely where it should be at all times.
Cycling the Water to Build Healthy Bacteria
Before adding any fish, it was crucial to first establish the nitrogen cycle and beneficial bacteria in this new tank.
Cycling refers to growing colonies of good bacteria that convert fish waste from toxic ammonia and nitrite to safer nitrates. Completing this cycle takes patience but is so important.
There are a few options to kickstart the nitrogen cycle. I chose the fish food method which entails:
- Adding a few flakes daily as an ammonia source for 2-4 weeks.
- Testing water to measure bacteria levels and confirming fully cycled.
- Performing partial water changes whenever ammonia or nitrites exceed 1 ppm.
- Adding hardy species like danios or tetras to further build bacteria with bio load.
Following this process took a few weeks but ensured the tank could support fish fully before adding my betta. Taking the time to correctly cycle really pays off in the long run!
Potential Issues to Watch for with the Top Fin 3.5 Gallon
Overall, I’ve been extremely happy with the Top Fin 3.5 nano tank kit. But based on other hobbyists’ experiences, here are a few potential downsides to watch for:
- Filtration system could be more powerful for tanks stocked fully. Adding extra media can help.
- Light plastic trim may warp or crack over time. Using an acrylic solvent can re-bond pieces.
- Included thermometer can be inaccurate. Recommended to replace it with a better quality one.
- Light may not work well for high light plants or tanks deeper than 12 inches. Could need a light upgrade.
- Filter intake/output flow might be too strong for bettas. Baffle them with foam or plants if needed.
Luckily any issues are easily fixable and haven’t been dealbreakers for most owners. And Top Fin’s affordability makes up for areas where higher end brands would excel.
Reviews from Real Fishkeepers Using This Nano Tank
Before buying the Top Fin 3.5 setup, I did a lot of research on reviews from actual hobbyists using this tank. Here are some key takeaways:
- It’s a fantastic value for those wanting to get started with a small, inexpensive setup.
- Many said the included filter, heater, and lights exceeded expectations at this price point. They performed reliably.
- Most found it the perfect nano tank for bettas, shrimp, and nano fish due to the shape and 3.5 gallon capacity.
- Owners liked the clean, modern aesthetics of the rimless glass tank design. It looks more high-end than the low price suggests.
- Some wished the filter was a bit more powerful but found adding extra filter floss helped flow rate.
- A few had issues with the plastic top frame warping but were able to repair it with acrylic solvent.
Overall, the consensus for the value and beginner friendliness of this kit seemed very positive. Those reviews gave me confidence I was choosing a great starter tank!
Keeping Red Cherry Shrimp in a Planted 3.5 Gallon
In addition to fish, I was excited to try keeping freshwater shrimp in my nano tank as cleanup crew. Red cherry shrimp are commonly kept and bred in planted tanks as small as 3 gallons.
First, I researched their care needs:
- They prefer pH between 6.5-8 and temperatures from 68–85°F – easily achieved in my setup.
- They need lots of hiding spots amongst plants and rocks to feel secure. My tank layout provides that.
- Moss, java fern, and floating plants give them nutritious grazing areas.
- As natural scavengers, they help consume debris, algae, and aufwuchs in the tank.
I started with 5 healthy juveniles from my local fish store and acclimated them slowly. They immediately took to grazing on the moss and exploring their new heavily planted home!
Watching their bright red color pop against the green has been so enjoyable. The Top Fin 3.5 gallon creates the perfect planted shrimp haven!
Preventing Algae in a Small Nano Tank
Algae outbreaks are common in new tanks, especially small ones where nutrients are concentrated. Limiting light was the key for me in preventing major algae.
The hinged LED light that comes with this kit makes that easy. I keep it on the lower brightness setting for only 6-8 hours daily. The red and blue wavelengths also limit the types of nuisance algae.
Having a range of fast and slow growing plants helps outcompete algae for nutrients. And the shrimp graze constantly to clean plant leaves before algae takes hold.
I did deal with some minor green dust algae on the glass during initial cycling. But once the tank matured after about 2 months, it disappeared on its own. Staying on top of filter maintenance and water changes keeps nutrients in check too.
While no tank is completely algae free, following those steps from the start resulted in very minimal growth. The Top Fin’s flexible lighting and plant-friendly footprint paid off in helping suppress algae.
Picking the Right Substrate for Plants in a Nano Tank
Choosing a quality substrate provides vital nutrients for the live plants in my nano tank. The included gravel unfortunately doesn’t offer much for planted tanks.
But swapping it out for a better suited one was simple. After researching substrates, I chose Fluval Stratum. This volcanic soil contains key minerals needed for plant growth and health.
I drained and removed about 80% of the original gravel, then added a 1-1.5 inch deep layer of Fluval Stratum across the whole bottom.
The rich brown color complements the greenery beautifully. And I saw fast growth from my plants after switching. Their roots can access essential nutrients in this substrate.
For low tech setups, many aquarists also recommend substrates like eco-complete and ADA aquasoil. Though pricier, they’re worthwhile investments to support thriving plants long-term.
Safely Introducing Fish to the Established 3.5 Gallon Tank
Once my tank was fully cycled and the water parameters tested stable, it was time to add the fish! To avoid shocking them, I always follow these crucial acclimation steps:
- Float the unopened bag for 15 minutes to equalize temperatures gradually.
- Pour the fish and bag water into a clean bucket.
- Add small amounts of tank water to the bucket over 20-30 minutes. This slowly blends in the tank conditions.
- Use a net to move fish into the tank once acclimated. Discard bag water to avoid contaminants.
I introduced the tetras first, waited a week, then repeated the process with the betta. Staggering it prevented aggression issues. Now everyone gets along happily!
Taking it slowly is so important when adding new fish. Following this acclimation process minimizes their stress, making for healthier residents.
Key Tank Dimensions to Understand
When shopping for a nano tank like the Top Fin 3.5, it’s helpful to understand the key dimensions:
- Total volume – Measures the full water capacity in gallons. This is 3.5 gallons.
- Tank footprint – The base dimensions determining swimming space. Roughly 16 x 8 inches on this model.
- Tank height – The height from bottom to top rim. The 3.5 gallon tank stands about 9 inches high.
- Maximum depth – Deepest point bottom to top – usually around 8-10 inches for nanos.
Knowing these measurements helps visualize the actual tank size, shape, and swim room available. It allows choosing appropriate fish based on their needs.
The Top Fin’s wide footprint is better for fish requiring horizontal swimming space. While a taller, narrower option maximizes depth over length.
Where to Buy the Top Fin 3.5 Gallon Tank
The most convenient place I found to buy this nano tank kit is PetSmart, either in stores or online. The kit with included filter, light, and extras retails for around $60-70.
Sometimes sales bring it closer to $50-55. Signing up for their rewards program can lead to extra discounts too.
PetSmart currently has exclusive distribution rights on Top Fin tanks. So no other major retailers sell this exact 3.5 gallon model and setup.
I’d recommend calling your local PetSmart ahead to check current stock. Inventory has been limited lately due to supply chain issues. But they can look up other nearby stores as well.
You can also order online for delivery or in-store pickup. Just be sure to inspect the tank fully upon receiving it for any damage in transit.
Best Decor and Plants for the Top Fin 3.5 Gallon
Decorating my very first tank with plants and aquascaping elements was so enjoyable! I focused on low maintenance live plants suitable for a nano tank.
Here are some of my favorite decorations and plants for this 3.5 gallon setup:
- Anubias attached to mopani driftwood or stone – Provides color variety and nutrients from the water column. Easy to grow in any light.
- Java fern tied to decor – Grows larger than anubias with awesome lacy leaves. Roots feed from the water rather than planted.
- Cryptocorynes along the rear glass – Add nice dimension and movement with their reddish ruffle-edged leaves. Do well in medium to low light.
- Moss balls – Fun, natural accent that shrimp will graze on constantly. Help reduce algae growth.
- Red Root Floaters – Bright floating circle plants that attract shrimp to the surface. Great for reducing nitrates and diffusing light. Thrive in nano tanks.
- Smooth river rocks – Add scale and texture along the substrate. Help weigh down plants without sharp edges that could tear fins.
With these simple yet beautiful plants and decorations, I was able to create a thriving nano habitat that exceeded my expectations!